Friday, November 15, 2013

Going nuts. [Not really.]

I can't believe another week has gone by already. I mean, I love that it's Friday again, but man is timing passing by quickly. Seriously. We only have one more day in the decoration room and then it's onto the bread section. I also have to spend some time this weekend thinking of ideas for a holiday-themed cake for the Festival of Trees cake auction next week. I am sort of leaning towards North Pole / snowmen / penguins / winter wonderland theme, but I'm not exactly sure. I also think that we have to work in partners and I don't have one yet, so, there's that.

For this stint in the chocolate room we definitely seem to do one and a half things a day because we spend a really long time on whatever we are trying to finish. Today started off with making a coffee-flavoured ganache which actually smelled so delicious and I hadn't had a coffee yet and I just wanted to drink the chocolate. But I refrained. The method for ganache is pretty straightforward by now -- for this one, it was melt milk chocolate, heat cream and instant coffee, pour hot cream slowly into chocolate and stir, add softened pieces of butter. I was doing well until the temperature in the decoration room was so cold that my chocolate cooled down before my butter could completely melt into the ganache mixture. It was a quick fix though; all I had to do was put it on a double boiler again to heat up the chocolate a bit more so the butter would melt. And I didn't even have to ask what to do. LEARNING! Once the ganache was done, we set it aside, stirring every once in a while to make sure it didn't harden too much so that we'd be able to pipe it later.

After the ganache was done, it was time to cover our almonds from yesterday. We melted down some milk chocolate and coated the almonds, then refrigerated them for a bit, then coated them again and let them set. The third coat of chocolate had to be melted and tempered and then once those were coated, we rolled them in either icing sugar or cocoa powder. And that's pretty much it. We weren't really sure how much chocolate to coat the almonds with, so from group member to group member the chocolate to almond ratio differs dramatically. But I think no matter what ratio, milk chocolate and roasted / caramelized almonds will always taste good. Always.

The almonds before being coated in chocolate.

I could have just eaten them like this. They were delicious.

After the first two coats. They don't look that appetizing.

They were still pretty tasty though.

After the final coat of chocolate and cocoa powder.

They tasted better than they look.

At some point, when I was taking a picture of the caramelized almonds, Larry came into the decor room and said, "Here, take a picture of this. You can say it's marzipan. And no one can say anything. Because you're an artist." He came into the room at least three more times. I'm not even sure if that was the weirdest thing he said. [Larry is the hilarious Baking & Boulanger Art instructor.]

Huh?

We didn't go on our break til really late in the day today because the almonds took a really long time. Our chocolate kept setting so we had to melt it over and over again, which wasn't my favourite. Also, as per usual, there was chocolate on everything. I was initially wearing gloves while I coated the almonds in chocolate, but eventually I just started using my hands because I had to keep taking off and putting on gloves for various things. I managed to use one hand for the coating and one hand to control the rolling through the cocoa powder, so only one was fully covered in chocolate. My chef's jacket has chocolate on it in the weirdest places. I wouldn't even be able to explain it to you.

After we came back from the break, we put our ganache into a piping bag with a plain piping tip and just piped little dome-shaped ganache thingies [official terms, obviously]. I have to work on my piping skills with icing and chocolate because I am really bad at finishing the shapes without having a weird part that sticks up in all different directions. I know it has a lot to do with how you have to stop pressing on the piping bag and twist in a downward motion, but I can't really get my hands to move in the direction that I think they should go. But I was getting better towards the end. Maybe. Jean-Luc said that if there were pieces sticking up, we could just put a glove on and smooth them down. On Tuesday, we're going to dip the ganache in chocolate, creating amazing coffee-flavoured ganache-filled dark chocolate amazingness. (We may have been tasting -- testing? -- the ones from the previous group.)

---

Today's Recipes
Chocolate Covered Almonds
Arabica [Coffee Ganache]

Thursday, November 14, 2013

Life is like a box of chocolate.

So, we did (surprise) more chocolate work today. We made these boxes out of chocolate which was pretty intense and not my favourite thing. There was a reappearance of the heart acetate paper which I loved so much the first time around. If I did the entire thing again, I think I could do a better job. Jean-Luc mentioned how one of the downsides of the program being only a year is that there isn't really time to try things over again; you basically have enough time to do it once and if you screw up, you screw up. Put a bunch of perfectionists in a room and only let them try something once for a very specific amount of time, and the results aren't very pretty. In the case of our chocolate boxes, though, the results were okay.

First, we melted and tempered our chocolate. The room was really cold today, so when I tempered the chocolate, it mostly got stuck to the marble and was over-tempered so it got super lumpy. Not ideal. We had to eventually re-melt and re-temper it. But, before we did that we made the outside of the box. We used a sheet of bumpy acetate and spread the chocolate on it with a palette knife then placed it in a cake ring. I don't think I did a very good job of placing it in the ring, because as it was drying and setting, it pulled away from the sides a lot, giving it a less round and more awkward appearance. Then we made the tops of our boxes by pouring the chocolate onto a clean sheet of acetate and waiting til it started to set, then cut out a ring slightly larger than the cake ring we used for the actual box.

Once we had re-melted and re-tempered our chocolate, we poured some into the inside of our cake rings to create the bottom of the box. Easy enough. Then, we had to spread chocolate onto four strips of the heart pattern acetate -- a one-inch, three-inch, four-inch, and five-inch strip. The one-inch strip we just set on this plastic thing with ridges in it so it would have a curved appearance. For the other strips, we first spread the chocolate on, then we waited til it started to set, then we took a knife and used the back to make lines, creating approximately one-inch segments of chocolate. Then, we folded the strip onto itself and used the chocolate to hold the ends together. The result was sort of a giant teardrop-shaped tube. We did all three strips and then set them aside to dry. The temperature of the room was really messing with us today, more than it did yesterday. Because the chocolate started to set so quickly, when I pulled the knife through to create the segments, it pulled up a lot of the chocolate with it. I also made the layer of chocolate a little too thick, which I tend to do a lot. But, the more you know...

One of the annoying things about working with chocolate is that it gets EVERYWHERE and then it takes forever to clean up and then you just get chocolate on everything again... but I think I am growing to like chocolate work a lot more this round than I did earlier in the semester, even though the stuff that we've done has been challenging.

After our heart chocolate was dry, we pulled off the acetate carefully and the pieces came apart pretty easily. Not everyone in the group cut all the way through the chocolate with the knife, so the pieces stuck together more / broke in the process of gently prying them apart. We also leveled out the tops of the box by flipping it over and running the top edge on a warm metal plate (over a pot of hot water), which melted the chocolate down so it was all the same height.

Then, we made a "bow" on the top of the box by using melted chocolate to stick the ribbon pieces onto the top. We did the outside first and then refrigerated til set, then we did the inside pieces. Then, we cut our one-inch strip in two and placed those on as well. Except someone accidentally knocked into mine so the ribbons in front are not in the picture. But, that's okay.

Not actually supposed to be rough on the inside.

If I did it again, I would alter the outside ribbon placement.

The pieces were an awkward shape to fit together.

I really don't know how I feel about this.

Not my favourite thing we've done so far.

 After the chocolate boxes, all we did was caramelize some almonds. We are going to cover them with milk chocolate tomorrow. To caramelize them, we just put 50 grams of sugar and 20 ml of water in a pot, brought it to a boil, and added blanched whole almonds. The sugar eventually starts to crystallize around the almonds and as the sugar/almonds are stirred around, the sugar will eventually start to re-melt and caramelize. Once the the almonds are coated in a golden brown caramel coating (and they start making popping sounds), we added some cocoa butter and mixed it in. The cocoa butter is to keep the almonds from getting too sticky and I think it also improves shelf life. Then we just lay them out on a baking tray lined with parchment paper to cool for tomorrow. I may have eaten a few in the process. They were delicious. 

Wednesday, November 13, 2013

Melt, temper, repeat.

I missed yesterday's class, which happened to be the last day in the restaurant section. That said, I spoke to my group today and the restaurant wasn't even open. We had pretty much made everything in the booklet, so they got to choose something to make and they chose raspberry macarons from the Chocolate Affaire package of recipes. They also plated the rest of the chocolate pates (they decided how to plate them) and sent them out to the cafeteria. So, all in all, it seemed like I didn't miss too much which is great.

Today was the first day of our new rotations, so it's back in the decor room for us. I somehow feel less wary about piping chocolate all of a sudden, so when I found out we were working on the chocolate butterflies today, I wasn't too apprehensive. I also knew that work in the decor room can go a lot slower, so that was good too. I don't know if the nervousness is going away because I am getting better at it, or if I was just really excited to do the butterflies, but either works for me.

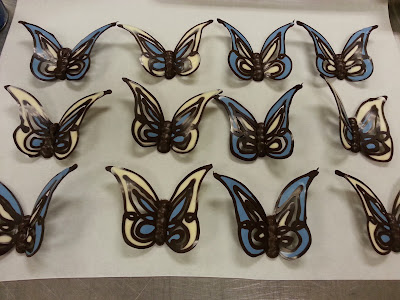
First, we melted and tempered some dark chocolate and made a bunch of cornets. Then, we started piping the outlines of each butterfly wing and basically kept going until we either had at least twelve good ones or filled up our sheet of acetate. Once those were done, we melted and tempered some white chocolate and added chocolate food colouring to it (fat-soluble rather than water soluble). I actually didn't have to add the colour because I was using some already made blue chocolate. The rest of the group made a light green, which was nice as well. With the blue (or green) chocolate, we did either the inside or the outside of the butterfly. I did a bunch of insides and a bunch of outsides in blue. Then we melted and tempered some white chocolate and filled in the unfilled parts. Jean-Luc told us after the fact that this does require working a little quickly, because otherwise the dark chocolate would curl and the white chocolate would seep under and make the wings look not as good.

The wings on acetate before being joined together.

This is the back.

Once we were all done with the dark, coloured, and white chocolate, we let them dry for a while and went on break. When we got back, we melted and tempered some more dark chocolate (anyone sensing a theme?). Then we gently removed the wings from the acetate and placed them between two bars on a piece of parchment paper, with a small amount of space between each wing. Then we piped the centres of the butterflies, making three to four blobs or chocolate going all the way down the middle. We let them dry on the bars, so that when they were removed, they kept their shape.

Chilling on the bar.

In the end, they looked pretty cool. Even if the backs looked kind of sketchy, the front looked really smooth and awesome. They weren't perfect, but can't expect perfection on the first try, right? It's sort of crazy to think that the only thing that these are is piped chocolate...

Here are a bunch of pictures from various angles:


A few more for good measure:


[Can you tell that I loved these? Because I did.]

Our piping test is in about four weeks, so I am hoping to use the time in the decor room to practice my piping skills. At least I've chosen my ten designs. I'm a little nervous, but I feel like the only way to get rid of that is to just practice a lot.

We spent most of today working on the chocolate butterflies, but we did one more thing before calling it a day. We made a raspberry pate a fruit, which is basically a jelly candy that will eventually be cut into squares and rolled in sugar. We brought some raspberry puree to a boil, added pectin and sugar, whisked it in, added glucose and sugar, whisked that in, brought it all to a boil again and after about a minute, added a few drops of tartaric acid. After this, we immediately poured the hot mixture into a silicone pan lined with parchment paper. We left them in the pans to set and we'll likely cut and coat them with sugar tomorrow.

OH, I almost forgot, today's demonstration was how to make Stollen, which is a traditional Christmas bread that I think only Jean-Luc can pronounce correctly. The dough was made yesterday and, like brioche dough, it has to rest overnight because otherwise it would be hard to work with. It has a lot of fruits and nuts in it, so given my dislike for things in things (...), I don't think I would particularly like it. But, anyway, Jean-Luc shaped it into a ball and rolled it into a log shape, then rolled it out with a rolling pin, leaving the edges thicker. Then, he took a bunch of high-ration marzipan (60% almonds), rolled it into a small cylinder and placed it in the centre of the dough. Then, one side of the dough is folded over. Then this is baked for around half an hour (or less if you are making smaller ones). The story behind the stollen? It's supposed to represent Baby Jesus (the marzipan) in a swaddling cloth (the dough). No comment. This was just the beginning of what I think will be lots of Christmas-themed baking stuff. 'Tis the season.

Also, Jean-Luc mentioned this a week or so ago. We have to start thinking of marzipan figures to put on a Christmas/Holiday-themed cake that will be donated to the Festival of Trees, which raises funds for the Mental Health Foundation of NS. So, that's pretty cool. I think he said that the cakes are auctioned off? He mentioned that it's important to remember to give back to the community, so it's pretty cool how we're incorporating that into our classwork. And especially when the community project this time around [mental health] is something that is already something close to my heart. I have no idea what my cake will look like yet, but there is still time to figure that out. I think we're supposed to know by the 21st. We may also have to work in groups of two.

I like being in the decor room because it feels slightly more relaxed. I think I get why it comes right after the restaurant section. Though, I have to say, this rotation of restaurant wasn't actually too bad. Looking forward to making this coffee-flavoured ganache that's in our recipe package... yum.

Thursday, November 7, 2013

Parfait Plating

I am SO excited for the long weekend. It's been hard getting back into the swing of things this week for some reason. Not sure why. It wasn't even that intense today. There were only about 10 reservations for lunch, so it wasn't til around 11:00ish that we really started prepping stuff for the service. The two options for dessert today were the chocolate pate, plated exactly the same as yesterday, and a Grand Marnier parfait with a financier cake, caramelized pineapples, anglaise sauce, sesame wafers, and a sugar spiral. [See below.]


The demonstration today was how to make choux paste, which is the base for cream puffs, eclairs, croquembouche, profiteroles, churros, and many other things which I am not really familiar with (e.g. Paris-brest, religieuse). Jean-Luc showed us how to make it and how to pipe different shapes for different things. A few people in the class have already made it because they were required for a few of the items in the chocolate buffet. The recipe is in one of our new packages, but I don't remember what section it's actually in. [Side note: the new recipes in a lot of the sections are awesome... so far, around the classroom there has been focaccia that smells and tastes delicious, carrot cake with cream cheese icing (and orange and green carrots along the edges!), New York style and chocolate cheesecakes, oatmeal cranberry cookies, banana bread, sourdough, and a lot of other really yummy things.]

Today we started off making the financier, which was sort of a weird cake to make. The four of us got 50% of the cakes bang on and then for two of them, the egg whites weren't quite folded into the mixture well enough so there were weird egg white patches in the cake. In our defense, the two people who made them before last week made them well, and the two of us that hadn't made them yet made the not-great-but-still-mostly-okay cakes.

After those were done, we made the mixture for sesame wafers. It was probably the simplest thing we've done so far. Put everything but the sesame seeds in a pot, heat it up, and then mix in the sesame seeds. Then we stored it in the fridge and after at least an hour, took them out, mixed it a little to ensure everything was blended, and then rolled them into little balls and pressed down the tops. Once baked, the sesame wafers were golden brown, thin, and crispy.

At some point we made the mixture for crème brûlée; half the group made vanilla and the other half made chocolate, so that we'd have two flavours for Tuesday. Once the mixture was made, we put it in an airtight container and refrigerated it so it would be good to use for next week. Thank you, Jean-Luc, for giving me a recipe that I sort of actually know how to make... the best part about cooking this in class is that you pass everything through a chinois at the end, so there is no worry about little cooked egg pieces getting into your final product. Also, when we were making it, we didn't heat the liquid up to a boil, which is what I had been doing when I made it at home. So there you go.

There was also a point where we caramelized the pineapples, which consisted of peeling and slicing the pineapple, adding some butter to a frying pan and letting it get hot, adding the pineapple and waiting for it to "seize", then adding the sugar and letting the fruit get a nice caramel colour. Yum. [Except I have a thing with warm fruit... but Jean-Luc kept eating the pieces, so I'm sure it was actually delicious. It tasted better cold though, which is how it was served.] These went in the fridge until we were going to use them later.

We also made sugar spirals which was mostly difficult because the sugar is really hot, so you have to wear oven mitts while also trying to control the cornet piping. Trying to pipe while wearing oven mitts is pretty challenging, in case you've never tried it before. But so necessary because you can feel the heat of the sugar through the oven mitts. (I also got hot sugar on my finger and it hurt A LOT.) We caramelized our decoration syrup and then filled at least three large cornets each with it and then placed these in the oven, waiting til the sugar was liquidy enough to work with. Once they were warm enough, you took one cornet at a time out of the oven (we had to keep stopping mid-spiral to warm them up) and try to pipe a spiral with the hope that the sugar wouldn't cool down too quickly on you. Overall, I think we did okay. The heat in the kitchen and in the service kitchen was making the sugar stick to the parchment paper though so we had a lot of spiral casualties in the process of trying to plate the desserts.

The chocolate pate plating was exactly the same as yesterday, so the only new things we had to do for that were make some whipped cream and cut up some more fruit. Jean-Luc didn't show it to us again because he expected us to remember it from yesterday. So it's a good thing we all took pictures...


I actually plated a few desserts in the restaurant today, mostly plates of parfait, but I was okay with that, because I think it was actually the easier thing to plate. It didn't require any expert piping skill, which I was pretty happy about. I really like the plating we have done so far in this section. The pate is definitely my favourite, but I also loved the strudel from yesterday and the parfait from today. The sugar spirals, even though they were hard to make, really added to the plating. The students in the restaurant kitchen waiting to take out the desserts looked really impressed when we were bringing them out (even though some of the sugar spirals weren't quite "parfait"...). So, that's a good sign.

---

Today's Recipes


Grand Marnier Parfait
Financier
Sesame Wafer
Anglaise Sauce
Chocolate Pate
Raspberry Coulis
Crème Brûlée
Chocolate Crème Brûlée

Wednesday, November 6, 2013

Stretching Dough and Other Kitchen Adventures

I was in an unexplainable bad mood today, so it wasn't ideal, especially because the restaurant section is not my favourite. But overall it went okay. I may have gotten a little angry mid-morning at the people who were crowding around me at the sinks trying to all wash their dishes at the same time, but I don't think anyone took it personally (though I did apologize later).

We started by making the dough for apple strudel which was straight forward enough. It was a straight dough method, so, everything in the mixer at once, then we put them in a KitchenAid with a dough hook and mixed on low until blended and then mixed on a higher speed for 5-7 minutes to build elasticity. After this was done, we let it rest in the fridge for about an hour. Then, we made the filling for the apple strudel, which meant a lot of peeling, coring, and dicing apples. Jean-Luc wanted us to make a batch between two people and then one person had to volunteer to work alone, which I did, so we had three batches between the five of us. After the last rotation where I ended up on my own due to a variety of factors, I'm pretty used to working on my own, and that also means Jean-Luc can't get as frustrated with you for going slower... except I am apparently a pro at peeling apples, because I wasn't that far behind everyone else. After the apples were peeled and diced, we melted a LOT of butter in a frying pan, added the apples, and cooked them until they had softened, but weren't mushy. Then we added our sugar, vanilla, and cinnamon. Once these were mixed in, we removed the pan from the heat and added in our brandy-soaked raisins, mixed them in, and then folded in our bread crumbs. Then we placed the mixture in a bowl and let it cool in the freezer.

At some point, we took out our caramel ice cream from yesterday and compiled it into one mixture, and put it in the ice cream machine. Caramel ice cream is just as delicious as it sounds. Or maybe even more delicious than it sounds. It's hard to say. We also at some point took our Grand Marnier parfaits out of the silicone moulds, sprayed them with a white chocolate/cocoa butter mixture (USING A SPRAY GUN) and then put them back in the freezer. And we took the chocolate pate out of the tubes, which didn't go as smoothly as it did last time. Or maybe last time it didn't go smoothly either and it was just too long ago to remember. This time, we didn't do a very good job of preventing chocolate from getting on the back of the acetate strip, which caused them to stick to the tubes, which made them hard to get out without cracking them / breaking them entirely. But it meant there were a lot that we could just try... and they were yummy. Then we set these aside (in the fridge) to use for lunch.

After a bunch of things or maybe not that many, we cleaned our tables and got ready to roll out our strudel dough. Once we rolled them out to the size of our rolling pins, Jean-Luc lifted up the dough and put a table cloth under it, which made things a lot more mysterious... Then we literally stretched the dough until it was the width of the table by one a half times the length of the rolling pin. Stretching the dough was really cool. (The end result -- which we obviously didn't find out til later -- was a super flaky and delicious pastry.) We put one hand on top of the dough and then placed our other hand, palm-facing down, under the dough and pulled carefully. And continued all the way around until it was the width and length that we wanted. Once this was done, Jean-Luc showed us how to take the edges off, because the dough is thicker around the edges. He literally ripped a piece of the edge off and then rolled it around his finger as he ripped all the way along the edges of the dough, holding the rest of the dough down with his under hand, so it wouldn't rip too much off. Once this was done, we brushed the dough with butter and then placed our apple mixture in about a hand's width in from the side and the top of the dough in a log shape. Then, we used the table cloth to roll up the strudel, because since the dough is so thin, it's easier using the tablecloth than hands. Once the dough was rolled, we put it on a baking tray with parchment paper (full disclosure: Jean-Luc did mine because I was worried I'd break it while I was moving it) and then brushed it with butter again. Then we set it aside and went on break. Jean-Luc mentioned that this method was the traditional method of making apple strudel; some people just use puff pastry dough instead of stretching it out. I didn't even know "stretching the dough" was an actual thing. The things you learn...

I think it was actually when we came back from our break that we made the caramel ice cream. Then, we had to make two batches of raspberry coulis and two batches of anglaise sauce. I made one of the batches of coulis, which was easy because you basically had to combine all of the ingredients in a pot and then bring it to a boil. You are technically supposed to pass it through a chinois and then cool it down, but I may have accidentally used raspberry puree instead of frozen raspberries (whoops) so I didn't have to strain it because there were no seeds. After this, we had to melt down some dark chocolate and put them in two cornets in the oven and also caramelize some decoration syrup and get our silpats and some spoons ready. Jean-Luc was obviously testing our remembering skills because he kept giving us multi-step instructions all at once. We did a pretty good job of each remembering enough snippets of what he told us to be able to put it all together. Once the decoration syrup was done, Jean-Luc showed us how to make these cool sugar nest things that were way easier than any sugar decoration that we've made. The entire group gravitated toward making these though, but there was still a bunch of stuff we had to do to prepare for the lunch rush.

So a couple of us started doing that, which included pouring the various sauces (coulis, anglaise, caramel) into squeeze bottles, making some whipped cream, cutting some fruit, getting plates, and so on. Then Jean-Luc showed us how to plate each dessert. I really liked the plating he did this time, especially the ones for the chocolate pate. We used these awesome chocolate butterflies that the decoration group made today and they just looked beautiful on the plates. I didn't do much of the plating because there were a few too many of us in the service kitchen and not enough room to move around in there. So I cleaned up our workstation with another group member while a lot of the plating was happening. I did do a few apple strudels toward the end, which was great, because the dark chocolate and raspberry coulis on the chocolate pate plates were a little beyond my abilities.

White and dark chocolate pate in the decorative chocolate cup; butterfly made by decoration
group resting on rosette of whipped cream; assortment of fresh fruit; dark chocolate and
raspberry coulis in front

Warm apple strudel on top of anglaise and caramel sauce; decorative sugar nest stabilized by
whipped cream; dredged with icing sugar; imagine a scoop of caramel ice cream beside the
strudel in front of the sugar nest (it wasn't there in time for the picture)

 The best part of today was when a group of women who had just eaten at the restaurant walked by talking about how delicious all of the food was, especially the dessert. I asked one of them which dessert she had, and she'd ordered the chocolate pate and she loved it. Another woman asked if we had cooked the food, and we said, "No, just the dessert." And I think she replied, "Oh, it was right some good! I have diabetes, but I had to have one of those apple strudels..." It was nice to see people react so positively to the stuff that WE HAD MADE! Pretty cool. And a perfect end to the day.

---

Today's Recipes
Chocolate Pate
Apple Strudel
Caramel Ice Cream
Caramel Sauce
Raspberry Coulis
Anglaise Sauce

Tuesday, November 5, 2013

A healthy dose of caramel.

We started our new round of rotations today and I started in the Restaurant section with a completely new group of people (three of them had been in a previous group together and two of us were new). I didn't love starting in Restaurant, but at least this way, I get it out of the way early. Once this rotation is over, it's basically the end of the year, which is totally crazy. So, it'll go Restaurant, Chocolate, Bread, Viennoiserie, Pastry and then THE END OF SEMESTER 1.

The restaurant was closed today because the head chef was away, so we sort of eased into the section instead of having to do plated desserts right away.

We made a dark chocolate and white chocolate pate, caramel ice cream, and caramel sauce.

The pate was very similar to the chocolate mousse we made the last time I was in the restaurant section and, like those, we also made the chocolate cups with the yellow cocoa butter design on the outside. So, we spread chocolate onto the strips of acetate and then placed them in little tubes, letting them harden while we made the chocolate mixtures. The dark chocolate was piped into the bottom and the white chocolate went on top of that, just to the rim of the chocolate border. Then we put these in the freezer overnight to use in the restaurant tomorrow.

Then we made a caramel ice cream mixture where we basically had to do a dry caramelization of sugar, add hot cream, add milk, bring to a boil, temper our egg yolks, pass through a chinois and then place in the blast freezer. Once they cooled down enough we moved them to the fridge. We weren't actually making the mixture into ice cream until tomorrow.

After the caramel ice cream, we made a caramel sauce that was made using a very similar method to the ice cream. (No eggs though.)

We also made Grand Marnier parfait, which was basically orange-flavoured ice cream, if I had to describe it. The theme of this new set of recipes seems to be adding alcohol to things, but maybe that's just me.

It always feels a little strange when the day ends without having completed anything, but we'll be putting all of the components together tomorrow when we actually have to plate desserts.

---

Today's Recipes

Chocolate Pate
Grand Marnier Parfait
Caramel Ice Cream
Caramel Sauce

Saturday, November 2, 2013

Chocolate pillows & sugar flowers

Bonus Saturday post! Only because a few of us volunteered (when he asked if a few of us could volunteer) to go in today to do some final touches for the fundraiser tomorrow. It was actually really nice to be in the kitchen when there were only six of us, including Jean-Luc. It was so quiet. And relaxed. I think it was a rough week for everyone because at one point Jean-Luc said, "Wouldn't it be nice if this could be like this everyday? Five people to a class."

We arrived at 8:30 and stayed til about 11:30. Almost everyone else was already there when I got there. [People get to class SO early everyday. If I found it easier to get out of bed in the morning, maybe I would too.]

I finished off our Chocolate Pillows from earlier in the week. We had rolled them into three equal logs and today I cut them into 12 pieces each (more like between 10-13...must work on even slices), rolled these into balls, and then rolled them first in regular sugar, then in icing sugar. Then they were placed on a baking tray and I pressed down the tops slightly. They were baked for about 7 minutes at 350 degrees in the convection oven. The way to tell that they are done is that they start to crack. It was funny because someone else in the class was walking by the oven and said, "Your cookies are starting to crack..." and then my timer went off. Good timing.


They were really chewy and gooey inside. Yum. After I baked ours, I baked another group's from yesterday. They were already shaped, so I just had to roll them in the sugar and put them in the oven. I also finished up the Chocolate Indulgence, which are another kind of chocolate cookie. I didn't take a picture of these, because I didn't actually make the mixture... (and also because I forgot). All I did was cut the logs into slices and bake them. They just looked like chocolate cookies with chunks of chocolate and possibly various kinds of nuts in them. I'm actually not even sure. For these, it was pretty much the same baking time and temperature. With chocolate cookies, it's hard to tell when they are done, because the colour doesn't change. For these ones, Jean-Luc said that the sides would start to crack and then it would spread to the centre, once it does that, they are ready to be taken out of the oven. They looked deliciously chewy and chocolatey too. I'm not a fun of chunks of nuts in my cookies though, so I didn't try one of these. We saved baking these until the day before so that they wouldn't get dried out waiting for Sunday.

Once the cookies were cooling down, everyone in the kitchen was working on pulling sugar. We heated up 400g of isomalt and 40g of water to 150 degrees, stirring constantly, but not enough to get the sugar all over the sides of the pot. Once it was at 150, we removed it from the heat, and poured it onto a silpat (which is a silicone baking mat) that had three drops of food colouring on it. Once the isomalt started to cool down and set a little, we used our finger (wearing latex gloves) to bring in the edges until it was in a ball shape. Then we folded it over a bunch of times, alternating between folding it sideways and top to bottom, to incorporate the food colouring. Once the isomalt held its shape after folding, it was ready to be pulled. We pulled the sugar (from right to left) then folded it once, then again, and repeated until it had a shiny look to it. Once this was done, we cut it in two pieces and then we shaped little petals, flattened out the edges, pulled, twisted, and snapped them off. Then we pressed it into a mould, rounded the edges, and brought the end together a little. We made a bunch of little petals and then some bigger ones.

The centre of the pulled sugar flower that we were obviously making was a ball of blown sugar, which was really cool. Jean-Luc showed us how to do this by shaping the sugar on top of the end of this weird-looking tool and then pumping air into it slowly. Then once it cools down enough (usually after holding it in front of a fan), it can be removed and you have a little hollow ball. We held the petals over the stove just enough to melt the ends a little and then stuck it on to the centre of the flower. Jean-Luc did most of my flower, but I'm claiming it as my own anyway. We also made little sugar swirls by pulling the sugar and wrapping it around a metal tube, then sliding it off once it cooled a little.


While working with sugar, it is important for it to stay warm, because once it starts to cool down it gets really hard to work with. We kept it under a heat lamp when we weren't using it and had to pop it into the microwave for a few seconds if it got too cool (Ha, ha. Too cool...). Also, when shaping it, you have to do it fast because once it hardens, if you try to shape it, you will just snap whatever you're working on into pieces. I had a pile of broken petals by the end (but then we just heated it up and melted it back into one big ball of sugar). Oh, also, the sugar is REALLY warm. My hands were sweating in the latex gloves. But if I wasn't wearing them, the skin would probably be singed off. So, there's that.

After the sugar stuff was done, I just had to pack up the cookies I made earlier and then we were done for the day. I'm sort of sad that I can't go to the event tomorrow, but I am happy that I get to sleep in tomorrow.

---

Today's Recipes

Chocolate Pillows
Chocolate Indulgence
Pulled Sugar Mixture